

Open shelving looks good in a kitchen when everything on it earns its place, either by being genuinely useful or genuinely nice to look at, without competing for attention at the same time.
Get that balance right and open shelves can make a kitchen feel lighter, calmer, and more personal than a wall of closed cabinets. Get it wrong, and the same shelves can quickly become a dust-collecting collection of things everyone can see.
This guide focuses on the actual method not just a list of pretty objects to buy, but how to decide what goes on your shelves, where to place it, how much to display, and how to keep the whole arrangement looking intentional over time.
Quick Answer: How to Style Open Shelving in a Kitchen
- Decide if open shelving fits your cooking habits, kitchen size, and cleaning routine.
- Choose shelf height and spacing based on the counter below and what you’ll store.
- Pick a shelf material that connects with your cabinets, countertop, hardware, or wall finish.
- Sort your kitchen items into “display,” “daily use,” and “hide in a cabinet.”
- Build each shelf around one or two anchor pieces, then layer smaller items around them.
- Repeat a color or material across the shelves so they read as one collection.
- Leave visible empty space rather than filling every available section.
- Re-edit the shelves regularly and keep them clean, especially near the stove.
Is Open Shelving Actually Right for Your Kitchen?
Before styling anything, it’s worth being honest about whether open shelving fits how you actually cook and clean because the styling only works if the setup does.
Open shelving tends to work well when:
- You cook with a range hood and use it consistently.
- You’re willing to wipe shelves down regularly, especially near the stove.
- You already own dishware, glassware, or cookware you’d be happy to display.
- Your kitchen has enough wall space that the shelves won’t feel forced into a leftover gap.
- You like the look of a curated, lived-in kitchen more than a fully concealed one.
It tends to work poorly when:
- You fry or sauté often without much ventilation.
- You have very limited counter and storage space and need every inch to be functional.
- Your dishware is a mismatched mix you’d rather not have on display.
- You don’t have time for regular dusting and wiping.
- You’re in a rental where you can’t drill into the wall.
None of this means open shelving is a mistake, it means it’s a lifestyle decision as much as a design one.
A kitchen with frequent cooking near exposed shelves will need more upkeep than one with lighter cooking and good ventilation. That’s worth planning for before you commit to the look, rather than discovering it after the first month of grease and dust on your favorite mugs.
A popular middle ground is to keep open shelves on one wall or in a limited section of the kitchen while keeping closed cabinets elsewhere. You get the airy, styled look without giving up all hidden storage.
Where to Place Open Shelves: Height and Spacing That Actually Works

Styling starts with placement, because a shelf mounted at an awkward height will look off no matter what you put on it.
A common starting point is around 18–20 inches above the countertop for the bottom shelf, but the right height depends on the shelf depth, what you plan to store, and how you use the counter below.
From there, many kitchens use roughly 12–18 inches of vertical space between shelves, while taller items such as pitchers, large bowls, or cookbooks may need more room.
| Element | Typical Starting Point | Why It Matters |
| Height above counter | Around 18–20 in | Provides working clearance while keeping items accessible |
| Space between shelves | Around 12–18 in | Works for many everyday dishes and smaller objects |
| Space for taller items | 18–24 in or as needed | Allows room for pitchers, larger bowls, cookbooks, or decorative pieces |
| Shelf depth | Around 8–12 in | Provides useful storage without making the wall feel overly heavy |
These are starting points, not universal rules. Always consider the shelf design, the objects you plan to display, your counter use, and the manufacturer’s installation requirements.
Two placement details matter more than most people expect.
Anchor the Shelf Properly
A shelf loaded with stacked plates and glassware is heavier than it looks. Whenever the wall construction and installation allow, anchor the shelving into solid framing rather than relying only on basic drywall anchors.
Always follow the shelf manufacturer’s installation instructions and stated weight rating.
Consider Shelf Depth and Weight
A deeper shelf can create more leverage on its mounting hardware, while heavy dishes place additional load on the brackets or support system.
If you plan to store heavy stoneware, cast iron, or large stacks of dishes, choose a shelf and mounting system specifically rated for that use rather than assuming a decorative floating shelf can handle the load.
Consider the Cooking Area
Open shelves positioned very close to a working cooktop can collect grease and heat exposure more quickly.
Rather than relying on one universal distance rule, consider the shelf material, the cooking setup, ventilation, manufacturer’s requirements, and applicable local requirements when deciding where shelves should go.
Choose a Material That Ties Into the Rest of the Kitchen
The shelf material sets the tone before a single object goes on it, so it’s worth choosing on purpose rather than defaulting to whatever’s cheapest.
- Wood (stained or natural) — warm and versatile; fits farmhouse, modern-organic, and transitional kitchens.
- Painted or white shelving — reads clean and simple; works in cottage, coastal, and minimalist kitchens.
- Black metal or blackened steel — adds contrast against light cabinets and works well in modern or industrial kitchens.
- Glass shelves — suit glassware and lighter objects and can help a small kitchen feel visually open, although they show dust and streaks more easily.
- Stone or marble-look shelving — can echo a countertop or backsplash and create a higher-end appearance, but the added weight makes proper support especially important.
A simple rule that avoids most mismatches: pick a shelf material or finish that already exists somewhere else in the kitchen — your cabinet color, hardware finish, countertop, or trim — so the shelves look connected to the room rather than added as a separate decorating project.
The Actual Styling Method: How to Arrange What’s on the Shelf
This is the part most guides skip past. Here’s a repeatable process for making any shelf look intentional.

Step 1: Start With an Anchor Piece
Every well-styled shelf has one or two larger items that catch your eye first: a stack of cookbooks, a large pitcher, a wood cutting board propped upright, or a cluster of matching bowls.
Place the anchor slightly off-center rather than automatically putting one object in the middle. A little asymmetry can make the arrangement feel more natural.
Step 2: Use Small, Uneven Groupings
Grouping several objects together helps them read as one visual unit rather than a collection of unrelated items.
Groups of three can be a useful starting point, but they are not a hard rule. Two or four pieces can work just as well when the objects have different heights, shapes, or visual weight.
The goal is to avoid repetitive rows where every object is spaced exactly the same distance apart.
Step 3: Vary the Height, Not Just the Objects
Flat, uniform-height shelves look static.
Mix a tall item such as a vase, pitcher, or upright cutting board with a mid-height item such as a bowl or canister and something lower such as a plate stack or tray.
This creates visual rhythm without requiring more “stuff.”
Step 4: Layer Front-to-Back
Instead of lining everything up along the front edge, place a taller or larger item slightly behind a smaller one where the shelf depth allows it.
For example, lean a cutting board behind a stack of plates or place a small bowl in front of a larger serving piece.
This adds depth and keeps the shelf from looking like a straight row of objects.
Step 5: Repeat a Color or Material Thread
Pick two or three colors, or one dominant material, and let them appear across multiple shelves.
For example, you might repeat:
- Cream ceramics
- Warm wood
- Clear glass
- One muted accent color
The repeated visual thread is what makes several shelves of different objects read as one cohesive collection instead of a random assortment.
Step 6: Leave Visible Negative Space
This is the step people often skip, and it’s one of the most important ways to prevent clutter.
A shelf that’s completely full will look busy no matter how well the objects are chosen.
Leave visible breathing room around your groups rather than filling every available section.
You do not need to measure the empty space to a specific percentage. Instead, look for clear visual resting points between groups.
If objects are touching edge-to-edge or you cannot easily remove an everyday item, the shelf is probably too full.
How Full Should Open Kitchen Shelves Be?
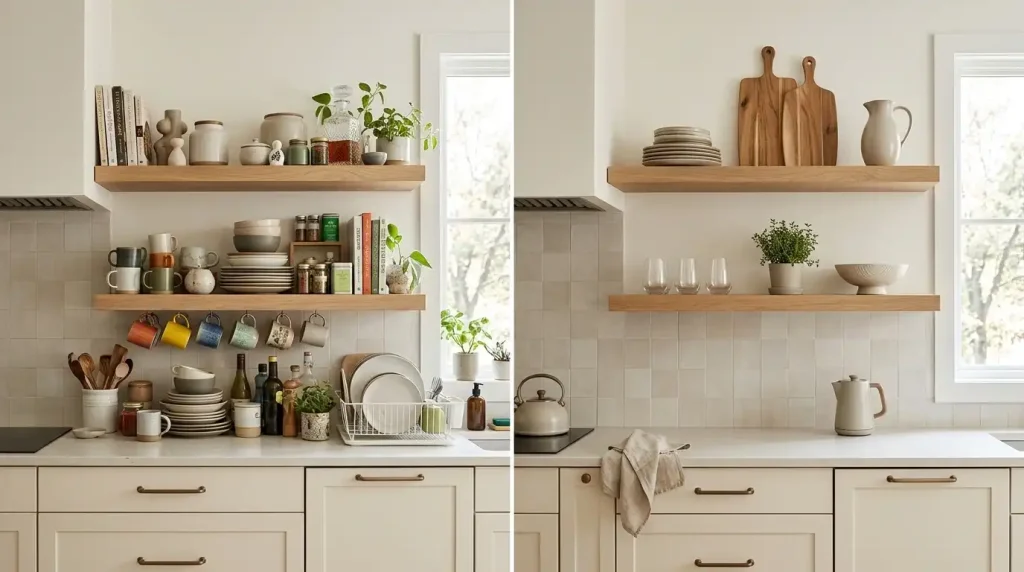
There is no universal number of objects that belongs on every shelf.
A short shelf may need only two or three visual groups, while a longer shelf can support more. What matters is how easily the eye can distinguish the groups and how much breathing room remains around them.
Use this simple test:
- Can you clearly see each main group?
- Can you remove an everyday item without moving several other objects?
- Are there visible areas of empty space?
- Do some objects stand out instead of everything competing equally?
- Does the shelf still look calm from across the room?
If the answer is no, remove something before adding anything else.
The goal is edited rather than empty.
What to Actually Put on Open Shelves
Open shelving works best as a mix of function and display not either/or.
Good candidates for open shelves:
- Everyday dishware in one or two coordinating colors
- Glassware, especially if it catches natural light
- Cookbooks, stacked or standing upright
- Bowls and platters used often enough to stay in regular rotation
- A small collection of pitchers, jars, or canisters
- Cutting boards stored on edge
- A small plant or herbs for texture and color
- Baskets for bread, produce, or linens
Better left in a closed cabinet:
- Mismatched or chipped dishware
- Items with dangling cords, such as small appliances
- Anything rarely used that will mostly collect dust
- Very heavy cookware unless the shelf and hardware are specifically rated for it
- Cleaning supplies and items you would rather keep concealed
A useful way to decide is to ask whether the item earns its space through frequent use, visual value, or both.
If it’s used daily and easy to keep clean, it may be a strong open-shelf candidate.
If it’s used once a month and requires extra dusting just to look presentable, a closed cabinet may be the better choice.
Consider Building “Stations”
Instead of styling shelves purely for looks, some of the most functional open-shelf kitchens are organized around tasks.
For example:
- A coffee station with mugs, filters, and a canister of beans
- A baking station with mixing bowls and measuring cups
- An everyday-dishware station near the dining area
- A serving station with platters, bowls, and serving pieces
This keeps the shelves genuinely useful while still looking curated, and it gives you a natural logic for what goes where.
Styling Open Shelves by Kitchen Style
| Kitchen Style | Shelf Material | What to Display | Overall Feel |
| Farmhouse / Country | Reclaimed or stained wood | Stoneware, woven baskets, glass jars, dried herbs | Warm, textured, collected |
| Modern Minimalist | Black metal, floating white, or slim wood | Matching white or neutral dinnerware, one or two plants | Clean, restrained, uncluttered |
| Coastal | Light wood or whitewashed shelving | Blue-and-white or clear glassware, light linens, natural textures | Airy, breezy, light-filled |
| Traditional / Transitional | Painted wood matching trim or cabinetry | Classic dinnerware sets, cookbooks, a few decorative pieces | Timeless, layered, comfortable |
| Eclectic | Mixed wood tones or a single bold color | Vintage finds, mismatched-but-coordinated pieces, collected objects | Personal, curated, conversation-starting |
Whatever the style, the same underlying principles apply — anchor pieces, small intentional groupings, a repeated color or material thread, varied height, and visible negative space.
Style changes the objects and materials, not the underlying method.
Open Shelving in a Small Kitchen
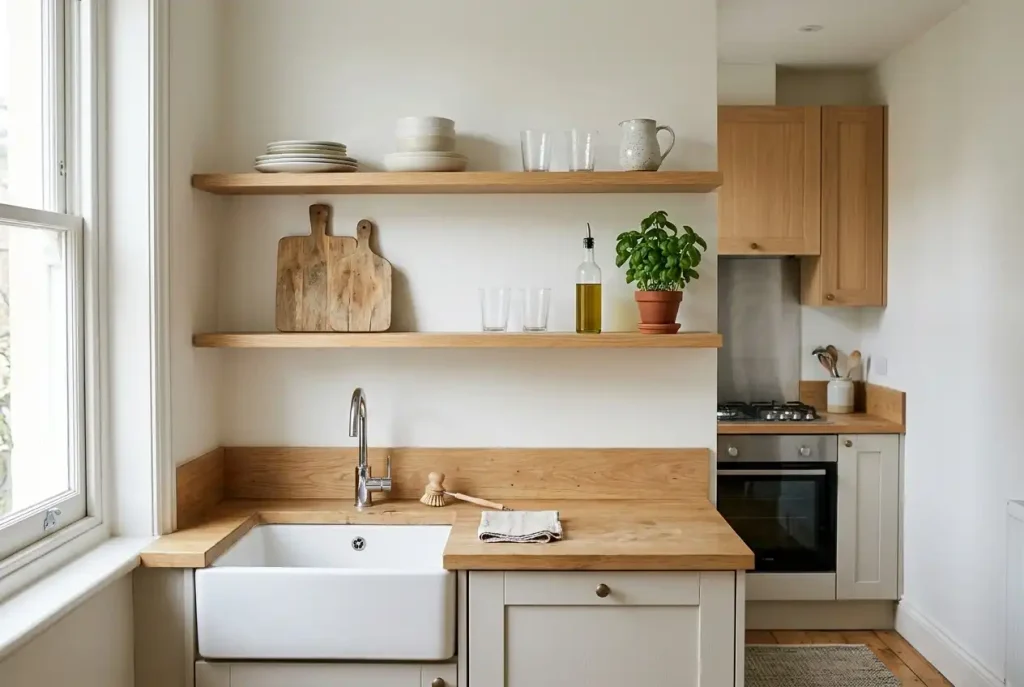
In a small kitchen, open shelving can make the room feel less visually enclosed because it removes some of the visual weight of upper cabinet doors.
A few adjustments make it work harder in a compact space:
- Stick to one dominant color, especially white or a soft neutral, so the shelves don’t add visual noise.
- Pare back further than you think you need to — a small kitchen shows clutter quickly.
- Use shallower shelves, where practical, so they don’t crowd the room.
- Prioritize daily-use items over purely decorative ones, since a small kitchen usually needs the storage more than the display.
- Use closed storage for bulky or visually distracting items.
For more small-kitchen strategies beyond shelving layout, storage, and lighting see our Small Kitchen Design Ideas Guide.
Renters and Temporary Setups
If you can’t drill into the wall, a few workarounds can still create the open-shelf look:
- Freestanding shelving units or a baker’s rack placed against a bare wall
- Tension-rod shelving systems designed for temporary use
- Removable, weight-rated adhesive shelf systems where appropriate
- Styling the top of existing cabinetry as a substitute for open shelving
These options are not necessarily as sturdy as properly mounted shelving, so keep the load lighter and always follow the product’s stated weight limit.
Common Mistakes to Avoid
Overfilling the shelf.
This is the most common reason open shelving looks cluttered instead of styled. If you can’t find visual resting points for your eye, there’s probably too much on it.
Displaying everything you own.
Open shelves work as a curated selection, not full inventory storage. Keep the rest in cabinets.
Ignoring the cooking area.
Shelves placed directly in areas exposed to frequent cooking may require more cleaning and maintenance.
Mounting without considering the wall structure.
A shelf loaded with dishware is heavier than it looks. Use appropriate hardware and follow the manufacturer’s installation requirements.
Lining everything up in a single row.
A perfectly even row of identical-height objects can look static. Vary height, depth, and grouping.
Matching too perfectly.
A shelf where every item has exactly the same color and shape can look sterile. Some variation in texture or shape helps it feel collected rather than staged.
Forgetting maintenance.
Open shelves near a working stove can develop dust and grease faster than closed cabinetry. That’s a normal trade-off of the style and should be considered when choosing what to display.
Keeping Open Shelves Looking Good Long-Term
Open shelving isn’t a one-time styling project it needs light, regular upkeep to stay looking intentional.
- Wipe shelves and displayed items regularly, with more frequent cleaning if they’re close to the stove.
- Run the range hood during cooking to help reduce airborne grease settling on nearby surfaces.
- Rotate items seasonally if you enjoy changing the look without buying new decor.
- Re-edit every month or two pull everything off, clean the shelf, and only put back what still earns its place.
How often should you dust open kitchen shelves?
A weekly wipe-down is a reasonable starting point for many kitchens, while shelves close to a cooking area may need more frequent attention because airborne grease can settle faster than ordinary household dust.
Do open shelves make a small kitchen look bigger?
They can make a small kitchen feel airier by reducing the visual bulk of upper cabinet doors, especially when the shelves are lightly and intentionally styled rather than packed full.
Can you put heavy items like cast iron on open shelves?
Only if the shelf and mounting hardware are specifically rated for that weight and properly installed. Many decorative floating shelves are not designed for heavy cookware, so check the manufacturer’s weight rating before storing cast iron or other heavy items.
Key Takeaways
- Open shelving works best when it matches your cooking habits and cleaning routine, not just the look you want.
- Use shelf height and spacing as starting points rather than universal rules, and follow the shelf manufacturer’s installation requirements.
- Style each shelf around an anchor piece, small intentional groups, varied height, and a repeated color or material thread.
- Leave visible negative space a completely full shelf almost always reads as cluttered.
- Mix function and display: keep daily-use items visible and store the rest in closed cabinets.
- Plan for regular cleaning, especially near the stove, since dust and grease are part of the open-shelf trade-off.
- Edit the shelves regularly so the display stays useful rather than becoming visual storage.
The most successful open kitchen shelves are not the ones with the most beautiful objects. They are the ones where function, proportion, color, texture, and empty space work together.
Related Next Steps
- Small Kitchen Design Ideas Guide — plan layout, storage, and shelving together in a compact kitchen.
- Condo Kitchen Renovation Ideas — for a fuller renovation that includes cabinetry and storage decisions.
- DIY Home Decor Ideas — for budget-friendly ways to build or refinish shelving yourself.
- Kitchen Decor Ideas — browse more kitchen styling and storage guides.
- Complete Home Decor Guide — plan decor decisions across the rest of your home.
Sources and References
- U.S. Environmental Protection Agency — Strategies for Improving Indoor Air Quality While Cooking — used for range hood and ventilation guidance related to grease and airborne particles near cooking areas.
- UpCodes — Stud Size, Height and Spacing (International Residential Code, Section R602.3) — used to confirm standard 16-inch on-center residential wall stud spacing referenced for shelf anchoring.

Join the Conversation
What Do You Think?